Step 3: Register the app and update the Visual Studio
- Step 3 a: Register the app in SharePoint
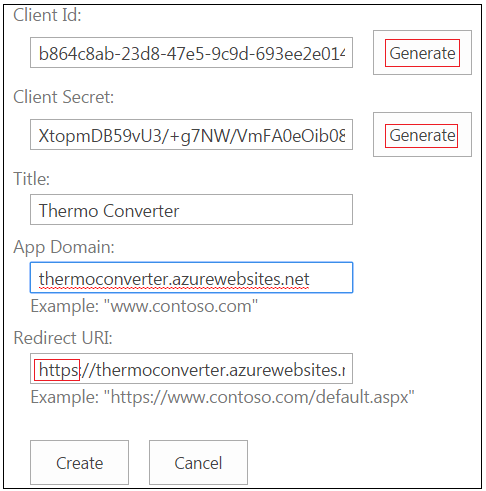
- Go the URL on your SharePoint Online Site: https://yourname.sharepoint.com /_layouts/15/appregnew.aspx
- Click generate for Client Id and Secret, new ids will be generated
- Give a title to the app of your choice
- Add app domain: This is your Azure web app with out HTTP or HTTPS
- Redirect URI: You may enter the URI: http://yourazureurl/default.aspx
- This part is tricky there are developers that use just HTTP and no /default.aspx in the end
- Please follow Register SharePoint Add-in from MSDN for more information

This is the most important step of all. Please save the following info you need this information later on!!

- Step 3 b: Update web.config file of the Azure Web App Project: Update ‘Client Id’ and ‘Client Secret’

- Step 3 c :Update the Permissions section of Manifest.xml by double clicking the the file

- Step 3 d: Update code of Manifest.xml by right clicking the file and click ‘<> View Code’


Continue Step 4: Create Publishing Profiles for Azure Web App and publish>>
Note: This blog post has been to split into multiple posts as they render fast with fewer images and it will greatly enhance the experience for readers accessing this via mobile devices