<#
.SNOPSYS
Excute Basic Powershell commands for absoulute beginners
.DESCRIPTION
This script is meant for education/demonstration purpose only
and not meant for production use
- This whole script is self explanatory
- The aim of this script is is introduce few basic of powershell which
would help to kick start using powershell
.NOTES
Author: Susheel Dakoju
Date Authored: 04/14/2015
#>
#--------------------------------------------------------------------------------
# Example 1: Windows PowerShell cmdlets similar to the .NET framework. See below
# Execute the following and see for yourself
# Most of the commandlet are in the form of Verb-Noun fashion
# 'Let' as told by Dictionary.com a diminutive suffix attached to nouns (booklet, piglet, ringlet, anklet, wristlet).
#--------------------------------------------------------------------------------
Get-Date
(Get-Date).GetType()
#--------------------------------------------------------------------------------
#Examplet 2: Similar to how you would do in .NET. ToShortDateString()can change the output format.
#The idea behind is example is show how simliar the experience would be for a .NET developer
#--------------------------------------------------------------------------------
(Get-Date).ToShortDateString().GetType()
#------------------------!IMPORTANT-----------------------------------------------
# Example 3: PIPELINES
# This is one of the most important concepts where one command can create object and pass on to the next command let
# This is not new and has been part for scripting for years.
# Another imprtant thing to notice is the Format-table option which lets you format your output.
#--------------------------------------------------------------------------------
Get-Process | Sort-Object -Property CPU -Descending | Select-Object -First 4 -Property CPU,VirtualMemorySize | Format-Table
#------------------------!IMPORTANT-----------------------------------------------
# Example 4: Alias
# Powershell ships with is own aliases this is for a good reason.
# For instance cls will work, but at the back ground it execure Clear-Host cmdlet
# You can create your Alias; Remembers Aliases are valid only per Session they
# get purged once session close use Import-Alias and Export-Alias commandlets
#--------------------------------------------------------------------------------
Get-Alias -Name dir # = Get-ChildItem
New-Alias ListItMyWay get-childitem
#--------------------------------------------------------------------------------
# Example 5: Variables and DataTypes
# Execute the following and check for yourself
#--------------------------------------------------------------------------------
$StoreMyInteger = 4
$StoreMyInteger.GetType()
$StoreMyString = "PowerShell Rocks!"
$StoreMyString.GetType()
Comparison and logical operators
#--------------------------------------------------------------------------------
# Example 6: Variables and DataTypes
# Execute the following and check for yourself
<#
#--------------------------------------------
a. Comparision Operators
#--------------------------------------------
-eq Equal
-ne Not equal
-ge Greater than or equal
-gt Greater than
-lt Less than
-le Less than or equal
-like Wildcard comparison
-notlike Wildcard comparison
-match Regular expression comparison
-notmatch Regular expression comparison
-replace Replace operator
-contains Containment operator
-notcontains Containment operator
-ceq Case-sensitive Equals
-creplace Case-sensitive replace
#--------------------------------------------
b. Types
#--------------------------------------------
-is Is of a type
-isnot Is not of a type
-as As a type, no error if conversion fails
#--------------------------------------------
c. Logical operators
#--------------------------------------------
-and Logical And
-or Logical Or
-not logical not
! logical not
#--------------------------------------------
d. Bitwise operators
#--------------------------------------------
-band Bitwise and
-bor Bitwise or
#--------------------------------------------
e. Format Operator
#--------------------------------------------
"format_string" -f Object1, Object2,...
#>
#>
#-----------
# Working with 'is' Operator: Re
#-----------
$stringValue = "PowerShell"
$stringValue -is "String"
# Just for fun know the retun Type
$($stringValue -is "String").GetType()
#-----------
# Working with 'eq' and 'ceq': Equal and Case-Sensitive Equal Operator
#-----------
$smallCase = "abc"
$UpperCase = "aBc"
$smallCase -ceq $UpperCase #return False
$smallCase -ceq $UpperCase #return True
#-----------
# Working with 'Like'
#-----------
"susheel" -like "sus*" #return true
#-----------
# Working with 'Replace'
#-----------
"Windows Command Prompt" -replace "Command Prompt","Power Shell"
#end of Example 6: Variables and DataTypes
#--------------------------------------------------------------------------------
# Example 7: Arrays
# These are similar to .NET Array. See ways to declare and use them
# The interesting part is to assign items of different types similar to C# Object Type
#--------------------------------------------------------------------------------
$array1 = @('1','2', (Get-Alias -Name cls))
#--------------------------------------------------------------------------------
# Example 8: Script Flow and Execution Control
# Only gave example for if, else. Try the others by yourself
# Conditional Execution: 1. if elseif else | 2. Switch | 3. Switch -option
# Iteration Statements: 1. For | 2. For Each | 3. While | 4. do while
#--------------------------------------------------------------------------------
if ($status) {
$output = "time Service is enabled"
} Else {
$output = "time service disabled"
}
Write-Output $output
#--------------------------------------------------------------------------------
# Example 9: Functions
# A very basic function to add numbers and how to execute it.
#--------------------------------------------------------------------------------
Function AddNumbers([int] $value1, [int] $value2)
{
return ($value1 + $value2)
}
AddNumbers 1 2
#----------------------***! Very Important !***----------------------------------
# Example 10: Execution Policy
# A very basic function to add numbers and how to execute it.
<#
a. Restricted: No script execution is allowed.
B. RemoteSigned: Script execution is allowed only for the scripts authored
on the local computer but not for any scripts from the external sources
Not be executed unless they are signed by a trusted publisher.
C. AllSigned: All the scripts must be signed by a trusted publisher including
scripts authored on the local computer
D. Unrestriced: All scripts ARE executed without any restriction.
#>
#--------------------------------------------------------------------------------
#----------------------
# Fetch the current Execution Policy
#----------------------
Get-ExecutionPolicy
#----------------------
# Set Execution Policy
#----------------------
Set-ExecutionPolicy -ExecutionPolicy Restricted
Author: dakojususheel@gmail.com
Introduction to PowerShell for Azure – Creating a VM
<pre><#
.SNOPSYS
Excute Basic Azure command and create a VM
.DESCRIPTION
This script is meant for education/demonstration purpose only
and not meant for production use
- Initial section of the script covers basics commands to get connected with Azure
- The rest of the script covers creating a VM with SQL Server running.
.NOTES
Author: Susheel Dakoju
Date Authored: 04/13/2015
#>
#-----------------------------------------------------------------------------
# 1. Connect to Azure: Option 1: Add-AzureAccount
#-----------------------------------------------------------------------------
#Connect
Add-AzureAccount
#Check subscription details
Get-AzureSubscription
#-----------------------------------------------------------------------------
# 1. Connect to Azure: Option 2: Get-AzurePublishSettingsFiles
#-----------------------------------------------------------------------------
#Download PublishSettingsFile
Get-AzurePublishSettingsFile
#Import Setting Files
Import-AzurePublishSettingsFile "C:PowershellAzureVisual Studio Ultimate with MSDN-4-14-2015-credentials.publishsettings"
#-----------------------------------------------------------------------------
# 2. Export all the exiting images in the VM Gallery and
# copy the name image you want to create
# Note: There are more elegant way of doing this.Here the most basic form is demonstration. See below
<#
$vmimages | where {$_.Label -like 'sql server 2014*'} | select Label, RecommendedVMSize, PublishedDate | Format-Table -AutoSize
$imgtouse = $vmimages | where {$_.Label -eq 'SQL Server 2014 RTM Enterprise on Windows Server 2012 R2' `
-and $_.PublishedDate -eq '6/9/2014 3:00:00 AM'} | select ImageName
#>
#-----------------------------------------------------------------------------
Get-AzureVMImage > C:PowershellAzureimages.txt
#-----------------------------------------------------------------------------
# 3. Create new Azure VM
#-----------------------------------------------------------------------------
New-AzureVMConfig -Name 'sdcapsandbox1' -InstanceSize Basic_A3 -ImageName 'fb83b3509582419d99629ce476bcb5c8__SQL-Server-2014-RTM-12.0.2361.0-Enterprise-ENU-Win2012R2-cy14su05' |`
Add-AzureProvisioningConfig -Windows -AdminUsername 'sdcapsandboxuser1' -Password 'Administrator@1234'|`
New-AzureVM -Location 'East US' -ServiceName 'sdcapsandbox1'
#-----------------------------------------------------------------------------
# 3.Check if the New VM is generated
#-----------------------------------------------------------------------------
#Get-AzureVM
#------------------------------------------------------------------------------------
# Optional: If New-AzureVM errors out on storage account. Keep the following handy
# - Use one of the storage accounts or create a new one run Set-AzureSubscription
#------------------------------------------------------------------------------------
#Get-AzureStorageAccount
#Set-AzureSubscription -SubscriptionId 16c41f83-c83e-476a-8fdc-51b8ae69849f -CurrentStorageAccount mystorageaccount
</pre>
Introduction to PowerShell for SharePoint Online -2
<#
.SYNOPSIS
Create SharePoint Sites on SharePoint Online

.DESCRIPTION
- This script demonstrated creating sites for SharePoint Online.

--------------------------------------------------------------------------------
Code generated by: Susheel Dakoju., Windows Powershell Host v 3.0
Generated on: 04-12-2015 19:28
Generated by:
Organization:
--------------------------------------------------------------------------------
#>

#SharePoint Online Information
$SharePointOnlineURL = "https://contoso.sharepoint.com/"
$SharePontOnlineAdminSiteURL = "https://contoso-admin.sharepoint.com/"
$AdminUser = "usename@contoso.onmicrosoft.com"

#New Site Information
$newSiteURL = "testsite3"
$newSiteTitle = "testsite3"
$newsiteTemplate = "STS#0"

#--------------------------------------------------------------------
#1. Create SharePoint Online Site
#--------------------------------------------------------------------

#--------------------
# Connect to SharePoint Online Service
#--------------------
Connect-SPOService -Url $SharePontOnlineAdminSiteURL -credential $AdminUser

#Prepare Credentails
$password = Read-Host -Prompt "Enter password" -AsSecureString
$ctx = New-Object Microsoft.SharePoint.Client.ClientContext($SharePointOnlineURL)
$credentials = New-Object Microsoft.SharePoint.Client.SharePointOnlineCredentials($AdminUser, $password)
$ctx.Credentials = $credentials

#Create Web
$webCreationInformation = New-Object Microsoft.SharePoint.Client.WebCreationInformation
$webCreationInformation.Url = $newSiteURL
$webCreationInformation.Title = $newSiteTitle
$webCreationInformation.WebTemplate = $newsiteTemplate
$newWeb = $ctx.Web.Webs.Add($webCreationInformation)

#Load and Execute
$ctx.Load($newWeb)
$ctx.ExecuteQuery()

Write-Host "Title" $newWeb.Title

#End of Create SharePoint Online Site
Introduction to Powershell for SharePoint Online -1
<#
.SYNOPSIS
#Basic command lets for SharePoint online

.DESCRIPTION
# This powershell script is generated just to get
very basic understanding
# of how you can connect with SharePoint Online and
execute basic GET Commands
# The scripts generates output in two formats CSV and
HTML to two folder on the system

.NOTES
#Author: Susheel Dakoju.
#Generated on: 04-12-2015 19:28
#Generated by:
#Organization: Windows Powershell Host v 3.0

#>

#Import-Module Microsoft.Online.Sharepoint.PowerShell

<#
1.Connect-SPOService
Description: Shows how a SharePoint Online global administrator with a user name and password connects to a SharePoint Online Administration Center that
has the URL http://contoso-admin.sharepoint.com/.
#>

$URL = "https://contoso.sharepoint.com/"
$AdminURL = "https://contoso-admin.sharepoint.com/"
$AdminUser = "usernam@contoso.onmicrosoft.com"
$csvurlprefix = "C:PowershellOutputcsv"
$htmlurlprefix = "C:PowershellOutputhtml"

Connect-SPOService -Url $AdminURL -credential $AdminUser
#-----------------------------------------------------------------------------------------------#
<#
2.Get-SPOSite
Description: Lists the site collection with detailed properties.
#>

# Export to CSV
Get-SPOSite $URL -Detailed | select * | Export-CSV -path "$($csvurlprefix)GetSPOsite_CSV.csv"

# Export to HTML
Get-SPOSite $URL -Detailed | select * | ConvertTo-Html | Set-Content "$($htmlurlprefix)GetSPOsite_HTML.html"

#-----------------------------------------------------------------------------------------------#

<#
3. Get-SPOTenant
Description: Returns the organization-level site collection properties such as
StorageQuota, StorageQuotaAllocated, ResourceQuota,ResourceQuotaAllocated, and SiteCreationMode.
#>
# Export to CSV
Get-SPOTenant | Export-CSV -path "$($csvurlprefix)GetSPOTenat_CSV.csv"

# Export to HTML
Get-SPOTenant | ConvertTo-Html | Set-Content "$($htmlurlprefix)GetSPOTenant_HTML.html"

#-----------------------------------------------------------------------------------------------#

<# 4. Get-SPOUser

Description: Returns one user or security group account inside group Team Site Members from the site collection #>

# Export to CSV
Get-SPOUser -Site $URL | Export-CSV -path "$($csvurlprefix)GetSPOUser_CSV.csv"

# Export to HTML
Get-SPOUser -Site $URL| ConvertTo-Html | Set-Content "$($htmlurlprefix)GetSPOUser_HTML.html"
<# 5. Get-SPOSiteGroup #>

#Gets all the groups on the specified site collection.

# Export to CSV
Get-SPOSiteGroup -Site $URL | Export-CSV -path "$($csvurlprefix)SPOSiteGroup_CSV.csv"

# Export to HTML
Get-SPOSiteGroup -Site $URL | ConvertTo-Html | Set-Content "$($htmlurlprefix)SPOSiteGroup_HTML.html"
Introduction to PowerShell for SharePoint 2013 -2 (Administration)
&lt;# .SYNOPSIS -------------------------------------------------------------------------------- Code generated by: Susheel Dakoju., Windows Powershell Host v 3.0 Generated on: 04-11-2015 19:28 Generated by: Organization: -------------------------------------------------------------------------------- .DESCRIPTION - This script is generated for Capital Area .NET SharePoint Special Interest Group Meetup demonstration of basic Powershell commands for SharePoint - This script is running against SharePoint 2013 powered by Powershell version 3.0 - Run as administrator to run the script sucessfully. - This script is not for production use. The commenting and Intending is done to suite for quick demonstration and may not be adopted for organizational use -------------------------------------------------------------------------------- #&gt; #---------------------------------------------------------------------# #1. Create a new SiteCollection #Prequsites/Assumption: A ready made webapplication with no root sitecollection created via GUI or Powershell #---------------------------------------------------------------------# New-SPSite -OwnerAlias SDsdakoju -Url http://contoso.com:4234/ -Name "CAPAREA SharePoint Demo 1" -Template STS#1 #---------------------------------------------------------------------# #2. Create multiple new SiteCollection #Prequsites/Assumption: A ready made webapplication along with root site sitecollection created via GUI or Powershell #---------------------------------------------------------------------# #----------------------- #Create a new managed path #----------------------- New-SPManagedPath –RelativeURL "demo1" -WebApplication "http://contoso.com:4234/" #----------------------- #Create a new multiple sites #----------------------- New-SPSite -OwnerAlias SDsdakoju -Url http://contoso.com:4234/demo1/test -Name "CAPAREA SharePoint Demo 1" -Template STS#1 #already created New-SPSite -OwnerAlias SDsdakoju -Url http://contoso.com:4234/demo1/test1 -Name "CAPAREA SharePoint Demo 1" -Template STS#1 #already created New-SPSite -OwnerAlias SDsdakoju -Url http://contoso.com:4234/demo1/test2 -Name "CAPAREA SharePoint Demo 1" -Template STS#1 #already created New-SPSite -OwnerAlias SDsdakoju -Url http://contoso.com:4234/demo1/test3 -Name "CAPAREA SharePoint Demo 1" -Template STS#0 #already created #---------------------------------------------------------------------# #3.Remove/Delete SiteCollection #---------------------------------------------------------------------# Remove-SPSite -Identity http://contoso.com:4234/demo1/test2 -Confirm #Check if deleted Get-SPSite -WebApplication http://contoso.com:4234/ #---------------------------------------------------------------------# #3.Export a site #All the operation in this section can be done even with UI under Back up and Restore section in CA #---------------------------------------------------------------------# Export-SPWeb -Identity http://contoso.com:4234/demo1/test3 -Path demo1_test3.cmp #---------------------------------------------------------------------# #4.Import a site #All the operation in this section can be done even with UI under Back up and Restore section in CA #---------------------------------------------------------------------# Import-SPWeb -Identity http://contoso.com:1234/ -Path demo1_test3.cmp -Confirm -Force #---------------------------------------------------------------------# #5.Export a List or Library # This is similar to Exporting a whole SPWEB but if Item URL is specified it exports only that. #---------------------------------------------------------------------# Export-SPWeb -Identity http://contoso.com:4234/demo1/test3/ -Path demo1_test3_doc1.cmp -ItemUrl "/demo1/test3/Shared Documents" #---------------------------------------------------------------------# #6.Import a List or Library # This is similar to Importing a whole SPWEB, since Item URL is specified in export, import will get list only. #---------------------------------------------------------------------# Import-SPWeb -Identity http://contoso.com:1234/capareademo1/ -Path demo1_test3_doc1.cmp -Confirm -Force
Introduction to PowerShell for SharePoint 2013 -1 (Developer)
<#
.SYNOPSIS
--------------------------------------------------------------------------------
Code generated by: Susheel Dakoju., Windows Powershell Host v 3.0
Generated on: 04-11-2015 19:28
Generated by:
Organization:
--------------------------------------------------------------------------------
.DESCRIPTION
- This script is generated for Capital Area .NET SharePoint Special Interest Group Meetup demonstration of basic Powershell commands for SharePoint
- This script is running against SharePoint 2013 powered by Powershell version 3.0
- Run as administrator to run the script sucessfully.
- This script is not for production use. The commenting and Intending is done to suite for quick demonstration and may not be adopted for organizational use
--------------------------------------------------------------------------------
#>

#---------------------------------------------------------------------------------------#
# Getting Started
#---------------------------------------------------------------------------------------#

#---------------------------------------------------------------------#
#1. Get Current Powershell Version
#---------------------------------------------------------------------#
$PSVersionTable.PSVersion

#---------------------------------------------------------------------#
#2. Get count of Commands with 'SP' in the name SharePoint Snap-In
#---------------------------------------------------------------------#
Get-Help *sp* | Measure-Object

#---------------------------------------------------------------------#
#3. Get count of Commands with 'SP' in the name BEFORE ADDING SharePoint Snap-In
#---------------------------------------------------------------------#
Add-PSSnapin -Name Microsoft.SharePoint.Powershell
Get-Help *sp* | Measure-Object

#---------------------------------------------------------------------#
#4. Get count of Cmdlets with 'sp' in the name AFTER ADDING SharePoint Snap-In
#---------------------------------------------------------------------#
Get-Command *sp* | Where {$_.CommandType -match "cmdlet" }| Measure-Object
Get-Help *sp* | Measure-Object

#---------------------------------------------------------------------#
#5. Get count of Applications with 'sp' in the name AFTER ADDING SharePoint Snap-In
#---------------------------------------------------------------------#
Get-Command *sp* | Where {$_.CommandType -match "Application" }| Measure-Object
Get-Help *sp* | Measure-Object

#---------------------------------------------------------------------#
#6. Get count of Applications with 'sp' in the name AFTER ADDING SharePoint Snap-In
#---------------------------------------------------------------------#
Get-Command *sp* | Where {$_.CommandType -Match "cmdlet" -and $_.ModuleName -Match "Microsoft.SharePoint.PowerShell" }| Measure-Object
Get-Help *sp* | Measure-Object

#---------------------------------------------------------------------------------------#
# Developer: The folloowing script block creats and add content to SharePoint 2013 Sites
#---------------------------------------------------------------------------------------#
#---------------------------------------------------------------------#
#1. Get all available Web Templates
#---------------------------------------------------------------------#
Get-SPWebTemplate

#---------------------------------------------------------------------#
#2. Get availablet Web Templates which are team site or black site
#---------------------------------------------------------------------#
Get-SPWebTemplate | Where {$_.Title -match "Team Site" -or $_.Title -match "Blank Site"}

#---------------------------------------------------------------------#
#3. Demo: Insert Command from Show-Command window
#---------------------------------------------------------------------#
Show-Command
#New-SPWeb -Url http://conteso.com:1234/capareademo1/Caparea_1 -AddToTopNav -Name Caparea_1 -Template STS#1 -UseParentTopNav
#New-SPWeb -Url http://conteso.com:1234/capareademo1/Caparea_2 -AddToTopNav -Name Caparea_2 -Template STS#1 -UseParentTopNav

#----------------------**** Important *****---------------------------#
#4. The Start-SPAssignment cmdlet properly disposes of objects used with variable assignments
# 'Global' Parameter- All objects are assigned to the lifetime of the script
# Read more at : https://technet.microsoft.com/en-us/library/ff607664.aspx
#---------------------------------------------------------------------#
Start-SPAssignment -Global

#---------------------------------------------------------------------#
#5. Create two SharePoint List of Type Tasks and Document Library.
#---------------------------------------------------------------------#
$web = Get-SPWeb -Identity http://conteso:1234/capareademo1/Caparea_1
$web.Lists.Add("Project Tasks", "Holds Project Tasks","Tasks")
$web.Lists.Add("Project Documents", "Holds Project Documents","DocumentLibrary")

#---------------------------------------------------------------------#
#6. Updating SharePoint Content
#---------------------------------------------------------------------#
$lst = $web.Lists["Project Tasks"]
$lst.Title = "Project Tasks 1"
$lst.Update()
#forget update

#---------------------------------------------------------------------#
#7. Remove SharePoint Content
#---------------------------------------------------------------------#
Remove-SPWeb -Identity http://conteso.com:1234/capareademo1/Caparea_1 -Confirm
Remove-SPWeb -Identity http://conteso.com:1234/capareademo1/Caparea_2 -Confirm

#-------------------------**** Important *****------------------------#
#4. The Stop-SPAssignment cmdlet properly disposes of objects used with variable assignments
# 'Global' Parameter- Disposed of when the Stop-SPAssignment cmdlet is called
# Read more at : https://technet.microsoft.com/en-us/library/ff607664.aspx
#---------------------------------------------------------------------#
Stop-SPAssignment -Global
Managed Metadata Services – SharePoint 2010/2013: Part 2/4 – Creating your first Managed Metadata Service Application
This blog post Part 2/4 is all about what Managed Metadata is for SharePoint, why is it so important to maintain accurate and consisted metadata across portals and how SharePoint can help manage metadata.
Part 1: Introduction
Part 2: Creating your first Managed Metadata Service Application
Part 3: Creating Term set, Terms and Tagging content with managed terms.
Part 4: Leveraging Termset to create and update Site Navigation
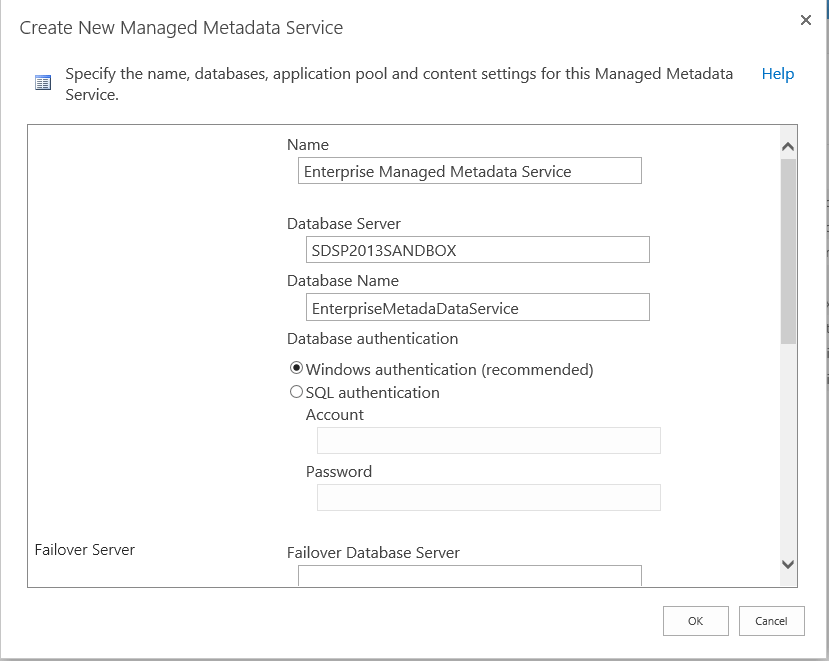
Step 1: Create new Managed Metadata Service using ‘New’ under ‘Service Applications’ section with in the ribbon.

Add new Managed Metadata Service
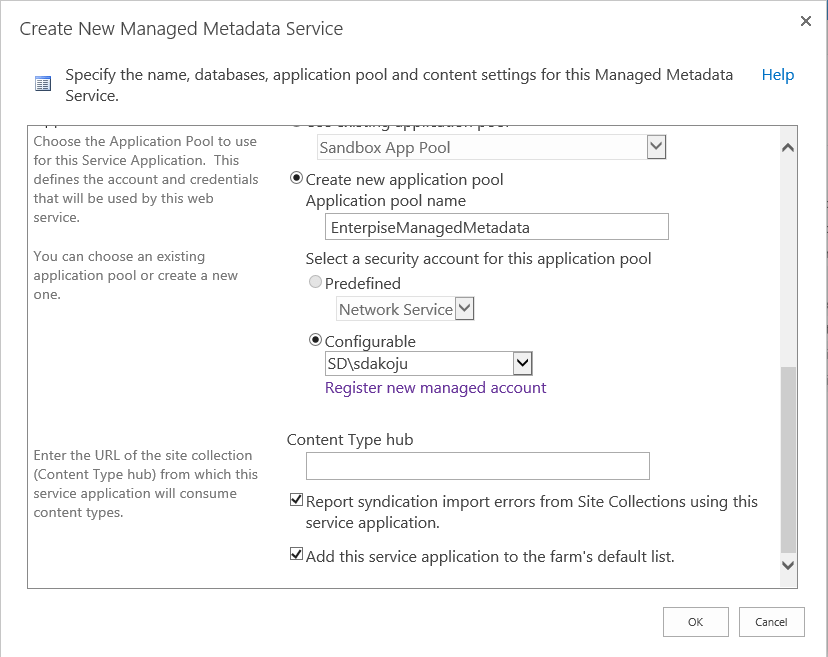
Step 2: Give appropriate name to your service application, database name and you may create or use an existing application pool.
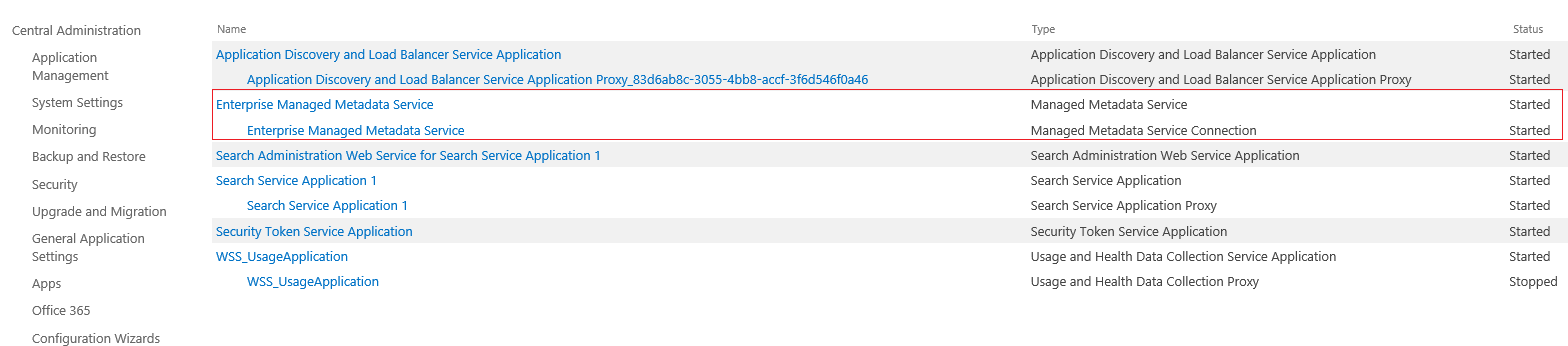
Step 3: Confirm if the Service Application is created. Please see highlighted below.

Step 4: Make sure Managed Metadata Web Service is started under Central Administration > System Settings > Manage services on server
You may have encountered the following error. Please see the resolution following the screen capture.

Make sure your ‘Managed Metadata Web Service’ is started.

Step 5: Reset IIS. Highly recommended.
You are all set! Congratulate yourself, you created your first Managed Metadata Service.
Things to observe:
1. You should see at a database created with the name you gave to the Database in step 2.

2. Also there Should be an entry in the IIS, click explore and you should see a folder with .svc file.

Please continue to read other related blog posts for more understanding of Managed Metadata services with SharePoint.
Managed Metadata Services – SharePoint 2010/2013: Introduction Part 1/4
Introduction
This blog post Part 1/4 is all about what Managed Metadata is for SharePoint, why is it so important to maintain accurate and consisted metadata across portals and how SharePoint can help manage metadata.
Part 1: Introduction
Part 2: Creating your first Managed Metadata Service Application
Part 3: Creating Term set, Terms and Tagging content with managed terms.
Part 4: Leveraging Termset to create and update Site Navigation
What is Metadata?
In a nutshell, Metadata is Data about Data. A perfect analogy would be a label on any soda container, the label indicates how many calories you end up consuming or how much of sugar goes into making that can of soda etc. As a consumer, all you care is soda not the label itself. But would you ever drink anything, if there is no label on the container? So as a customer label/metadata is the most important part, for you to make a purchase.
Similarly for a site having right metadata is as critical as data itself. Users have to understand how your content is structured which would help them navigate through the site seamlessly, also search experience should be commendable. Adding right metadata around your content will tremendously improve both of these and these are just two examples. There are plethora of reasons why you would need to choose right metadata.
What is Managed Metadata?
Manage by definition mean “be in charge of”. When you have lot of people authoring content on your site, how do you force people to add right metadata or tag content appropriately. An ideal solution would be, you would define a group of terms/tags that you would request authors to choose from. And this is it! This is core idea behind Managed Metadata, SharePoint provides this management of metadata as a Service Application to control it in a centralized manner. So if your SiteCollection subscribes to that service , your content authors can tag your content using those predefined tags/terms.
Why you would use Managed Metadata?
- Consistent use of terminology
- Better Search Experience
- Reusablilty and Easier Maintenance
- Better user navigation with in the site.
I would explain more about Termsets later in this blog, you could use them to define navigation on your site, it could be Quick Launch Bar or the Top navigation - Existing Limitations (Choice Column Type)
Columns of type ‘Choice’ would greatly help manage metadata, but if you have update or add an entry to a Choice column across multiple lists and across multiple sites you have to update for each of them. But with Managed Metadata you could update at one centralized location and users will have that readily available.
Please continue to read other related blog posts for more understanding of Managed Metadata services with SharePoint.
SharePoint Fast Search Concepts and Terminology – Part 4/4
This blog post is Part 4/4 of blog post series that will help you to get familiar with few concepts and terminologies referred in any search technology. As this blog series is more focused towards ‘Fast Search for SharePoint’ you may see jargon relevant to this.
Please check other related posts Part 1| Part 2 | Part 3 | Part 4
The following graphic gives ten thousand foot view of what I am trying to capture and explain in this blog post series.

8. Linguistics
Search engines perform a lot of language specific processing. This includes applying rules specific to that language and offensive language filtering, synonyms etc. Explaining in detail about how FS4SP behaves for languages is out of scope of this blog post.
9. Tokenization
When content sources are defined, Search engines crawl and will index those and will generate indexes. Some search engines refers to them as documents. Tokenization is a process of analyzing those documents and breaking the text into terms or tokens recognizable by the search engine.
10. Keyword Rank
This is the technique to improve ranking on documents that contains predefined keywords. This is a useful technique to forcefully enhance ranking among documents for better enhanced search experience.
11. Rank Profiles
Rank profiles are core component with FS4SP that defines how to rank items with in result set. There is a provision to create multiple Rank Profiles via Powershell, that defines how weights are applied to items or any components.
9. Keyword Rank
10. Rank Profiles
SharePoint Fast Search Concepts and Terminology – Part 3/4
This blog post is Part 3/3 of blog post series that will help you to get familiar with few concepts and terminologies referred in any search technology. As this blog series is more focused towards ‘Fast Search for SharePoint’ you may see jargon relevant to this.
Please check other related posts Part 1| Part 2 | Part 3 | Part 4
The following graphic gives ten thousand foot view of what I am trying to capture and explain in this blog post series.
7.Rank Tuning
By definition ‘Rank’ is the position in the hierarchy, in the search world ‘Rank’ is the position of the search result item in the result set. For instance, lets consider Bing or Google Search, when you search for ‘shoes’ or ‘vacation’ or in fact any search term you will find lot of search results. The first few results are the one user would click and finally end up being the revenue generators. So it is important to have your website show up in the first few results and is influenced by Rank. Seriously, how many times did you pass the first page of Google search results? So there are various technique that can be used to tune your Ranking. In the Fast Search world we have the following techniques.
7.1 Static/Quality Rank Tuning: URL Depth, Doc Rank, Site Rank, Hard Wired Boost
As the name indicates this the technique works independent of the search term. Which means that you would like to rank items independent of what user searches. Confused? OK, let me go through few examples and you would realize that you can tune Ranking independent of search terms.
URL Depth Ranking:
Observe the below URLs and think about which of the two link, you would prefer to click?
1. http://www.sdakoju.wordpress.com/post/2015/mostpopular/fastsearchconfiguration
OR
2. http://www.sdakoju.wordpress.com/FS4SPConfiguration
I would choose the second one, because it is more readable, clean and a more friendly URL. The depth of the URL is very less compared to the first one. ‘Depth’ indicates the importance or popularity of the page. The more deep the the page lies with in the site, the less popular the page is. Obviously, you would always highlight your popular pages as your landing or one level below items. Search engines would like to show popular pages and not disliked or unknown pages lying some where deep down in the site.
Doc Rank:
If you have a page that is referenced across multiple pages, it influences the rank. Pages like these are ranked higher.
Site Rank:
This is similar to Doc Rank, the more links pointing the site or items with in the site the site has a higher rank
Hard Wired Boost:
Items can be give static ranking via Powershell and forcefully shown are high rank items
7.2 Dynamic Ranking:
This ranking value is based on query and its relation to the result set. This ranking is based on an multiple techniques/algorithms that influence ranking. Covering those is out of scope of this blog post. Please refer to Tune Dynamic Rank